
TL;DR
Moving your rig into a closet can drastically reduce noise and reflections, especially if you focus on placement, sealing leaks, and selective dampening. Proper ventilation is key to preventing heat buildup, making a closet a surprisingly practical studio environment.
Ever wonder why some closet setups sound surprisingly good and others just sound hollow or boomy? The secret isn’t just slapping foam on the walls. It’s about where you put your gear, how you treat reflective surfaces, and making sure heat and sound don’t escape or get trapped. You’re about to learn exactly how to turn that tiny closet into a quiet, focused recording space—without breaking the bank or turning your room into a soundproof bunker.
This isn’t just theory. I’ll walk you through real-world tips—including what works for small spaces, how to position your mic, and the best ways to keep noise out and sound in. Whether you’re recording vocals, podcasts, or just trying to get cleaner recordings in a tight spot, these strategies will make a difference.
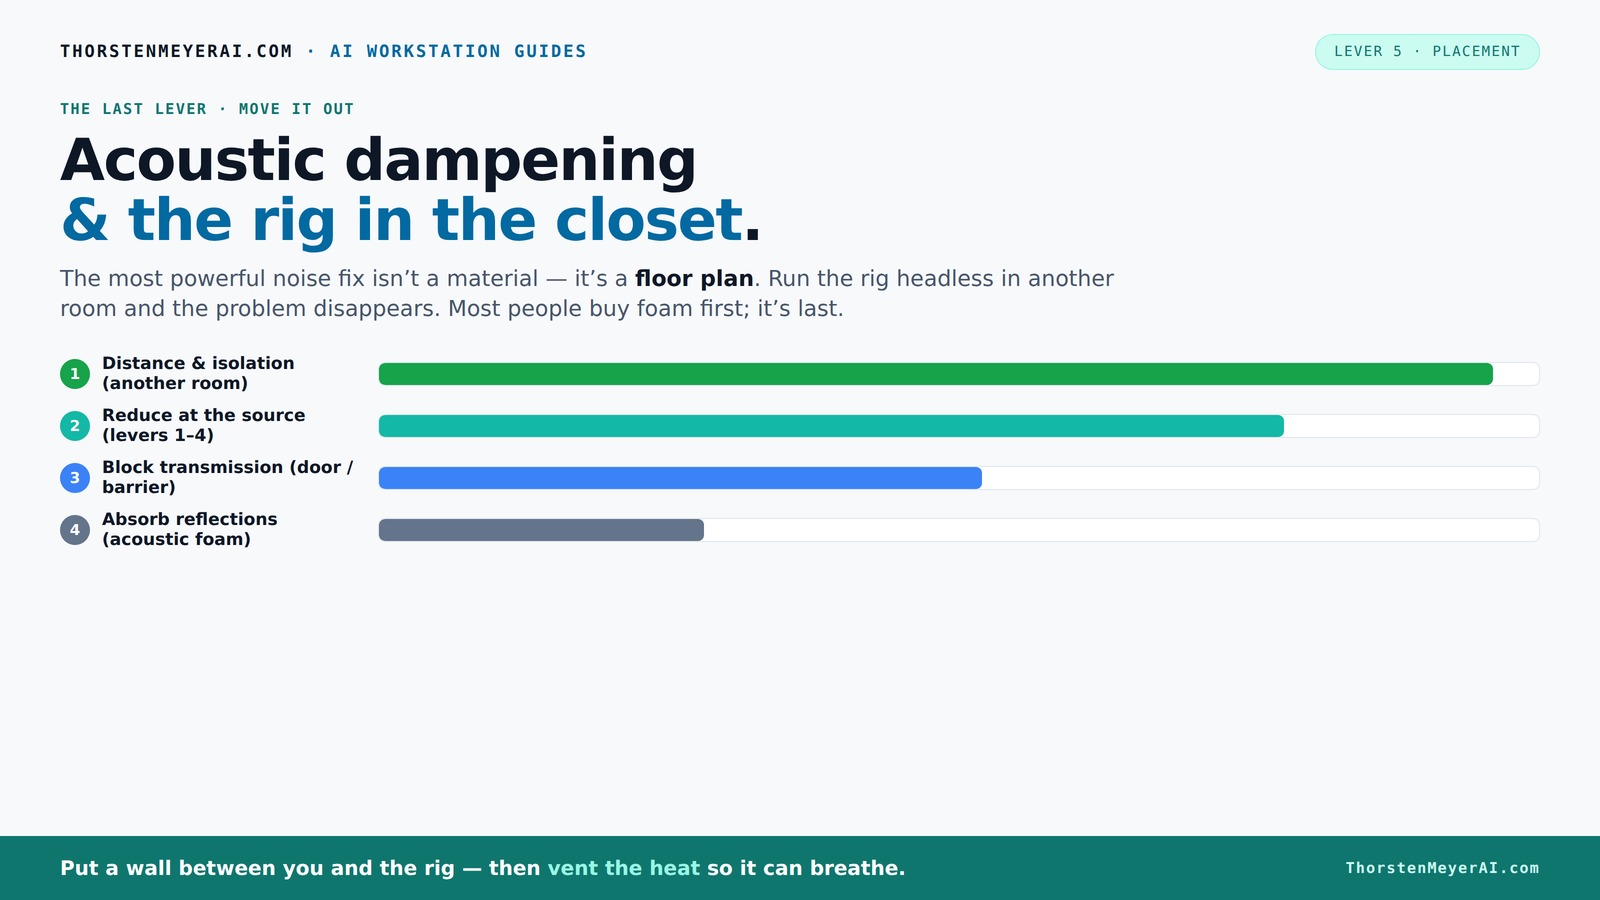
Acoustic dampening
& the rig in the closet.
The most powerful noise fix isn’t a material — it’s a floor plan. A rig you can’t hear because it’s in another room beats any amount of foam. Tap the approaches in Part 1 to see what actually works.
(another room)
(levers 1–4)
(door / barrier)
(acoustic foam)
Contain the noise, not the heat
Key Takeaways
- Prioritize placement—position your mic and performer to minimize reflections before adding foam or panels.
- Treat reflective surfaces—walls and ceilings matter more than just corners in small spaces.
- Seal all gaps around doors and vents—leaks are often the biggest sound escape route.
- Use bass traps in small, parallel-walled closets—to tame low-frequency booms and improve clarity.
- Ensure proper ventilation—hot rigs in closets need active airflow to stay cool and quiet.
Saiqiang Acoustic Foam Panels Sound Absorbing 12 Pack - 1" X 12"X 12" Sound Proof Panels Noise Reducing for Walls, High Density Sound Deadening Panels Black Wedge for Studio Recording & Office & Home
Professional Sound Absorption for Studios and Podcast Spaces - High-density acoustic foam panels and sound absorbing panels are...
As an affiliate, we earn on qualifying purchases.
As an affiliate, we earn on qualifying purchases.
Why placement beats foam every time for a closet studio
Placing your mic and performer correctly has a bigger impact on sound quality than adding foam or panels. Think of your closet as a tiny concert hall. The main goal is to control reflections—those echoing sounds bouncing off the walls—that create a hollow, boxy vibe.
By positioning your mic at the right distance from walls—about 6 to 12 inches—you reduce early reflections and focus on capturing clear, direct sound. For example, a singer standing 8 inches from the wall behind them, with the mic slightly in front, minimizes bounce-back noise and produces a warmer, more focused vocal.
The main reflection points are often the wall behind the mic and the ceiling directly above. Mark these spots with a piece of tape and treat those areas first, rather than wasting foam in corners alone. This targeted approach makes a huge difference in small spaces.
Why does this matter? Because reflections at these points can cause phase issues and muddiness in your recordings. Proper placement reduces these problems at their source, often eliminating the need for excessive damping. It’s a tradeoff—focusing on strategic placement can save you money and reduce clutter, while also improving clarity.

Audimute Soundproofing Acoustic Door Seal Kit - Door Sweep and Seal - (Standard Size)
Includes a Door Seal (3/16" x 1/2" x 25') and a Door Sweep (1/2" x 1.5" x 4').
As an affiliate, we earn on qualifying purchases.
As an affiliate, we earn on qualifying purchases.
How to position your mic and performer for the best sound
- Identify the main reflection points based on your setup. Use a mirror to see which surfaces bounce sound back to the mic. Understanding these points helps you target your treatment effectively, avoiding unnecessary panels in less critical areas.
- Place your mic at least 6 inches away from walls, aiming at the performer or vocal source. This distance helps minimize proximity effect and reduces the influence of reflections, resulting in a cleaner, more focused sound.
- Position the performer so they face away from reflective surfaces, turning slightly to one side if needed. This orientation reduces direct bounce-back into the mic, which can cause comb filtering and muddiness.
- Use a directional microphone—like a cardioid or hypercardioid—to focus on the source and reject side reflections. Directionality isn't just about capturing the sound; it’s about controlling which reflections are picked up, giving you more control over the room’s acoustic footprint.
For example, a YouTuber with a small closet found that placing the mic near the door, pointing away from the wall, cut down echo dramatically. They also angled their head slightly to avoid the ceiling reflection, creating crisper vocals. These subtle adjustments can have a profound impact on clarity, emphasizing the importance of thoughtful placement and orientation.

VEVOR Portable Vocal Booth, 6.56 ft Height, Portable Recording Studio with Travel Bag, Mobile Tablet Stand, Thickened Soundproofing, Sound Isolation Booth for Echo-Free Vocals, Podcasts, Voiceovers
Say Goodbye to Echoes: Built with durable Oxford cloth and acoustic padding, this recording booth for the home...
As an affiliate, we earn on qualifying purchases.
As an affiliate, we earn on qualifying purchases.
The secret to reducing echoes: treat wall surfaces, not just corners
Many assume corner bass traps are the magic fix. In reality, in tiny closets, wall and ceiling treatment matter more. Walls are where most reflections bounce back, creating a dull or boxy sound.
Adding absorbent panels on the entire wall surface—especially at reflection points—can be more effective than just corners. For example, one creator added thin foam panels all around their closet walls, which improved clarity without making it sound dead. This approach addresses the primary sources of early reflections and reduces the overall echo, resulting in a more natural and balanced sound.
Ceiling treatment is also key. A simple rug or hanging a blanket above the performer can cut down on the echo bouncing off the ceiling, which is often overlooked. This not only reduces harshness but also helps maintain a lively, yet controlled, room tone.
Why does this matter? Because focusing treatment on surfaces that reflect the most sound—walls and ceilings—can drastically improve your recording quality while saving money on unnecessary panels. It’s about understanding the room’s acoustic behavior and targeting your efforts where they count most.

Professional Studio Recording Microphone Isolation Shield, Pop Filter,High density absorbent foam is used to filter vocal. Suitable for Blue Yeti and other condenser microphones (AO-504 With Stand)
♪【The package contains】♪: Microphone Isolation Shield x 1, Metal Thread Adapter x 2 (Adapt most microphones), Adjustable Stand...
As an affiliate, we earn on qualifying purchases.
As an affiliate, we earn on qualifying purchases.
Sealing gaps and leaks—the overlooked step that prevents sound escape
Sound easily slips through gaps around doors, vents, and cracks. Sealing these leaks is one of the cheapest and most effective ways to keep noise in and reflections out.
Weatherstripping around the door frame, door sweeps, and acoustic sealant in cracks can reduce sound leaks by as much as 50%. For example, adding a thick moving blanket over the closet door—secured with clamps or hooks—can absorb sound and stop it from leaking into adjacent rooms.
Why is this so effective? Because sound leaks are often underestimated—those tiny cracks and gaps act like open windows for noise to escape. By sealing these, you create a more controlled acoustic environment, reducing unwanted bleed and improving overall sound quality. It’s a tradeoff: sealing is inexpensive but yields significant improvements, often more so than adding foam panels alone. It’s about controlling every possible escape route for sound, which enhances the effectiveness of your treatment and reduces the need for excessive damping inside the room.
Floor and door treatment: more than just a rug and a blanket
Flooring and doors are weak points. Bare floors reflect sound, and thin doors let noise leak out. Adding a thick rug or carpet reduces floor reflections and adds warmth to recordings. For example, a studio setup in a small closet used a shaggy rug, which softened footsteps and footfalls, improving recording quality.
Heavy blankets or moving blankets on the door block sound transfer. Hanging a blanket over the door frame or sealing it with draft stoppers can cut reflections and leaks. These DIY methods are cheap but highly effective. They help dampen both airborne sound and structure-borne vibrations, making your recordings clearer and less echoey.
Why does this matter? Because untreated floors and doors are often overlooked but can significantly compromise your recording quality. Addressing these points ensures a more balanced, natural sound and prevents external noise from creeping in. It’s a simple tradeoff—adding some fabric or dense material can vastly improve your room’s acoustics without major costs or construction work.
Why bass traps are your best friend in tiny spaces
Bass buildup happens in small, parallel-walled closets—low frequencies bounce back and create a boomy, muddy sound. Bass traps or low-frequency absorbers help tame this problem.
Adding a simple broadband bass trap in each corner can cut low-frequency resonance by up to 80%, according to acoustics research. For example, a musician with a tiny closet used DIY foam bass traps and saw a dramatic improvement in clarity and warmth. Without these traps, low-end frequencies tend to resonate and create muddiness, making it hard to hear the true tone of your recordings. Proper bass trapping balances the room’s low frequencies, giving a more accurate and professional sound.
In small spaces, thicker, dense panels or specialized bass traps are worth the investment because they absorb the frequencies that standard panels miss. The tradeoff is cost versus clarity—spending a little more on bass traps yields a significant quality boost, especially in confined environments where low-frequency issues are most pronounced.
Ventilation: keeping your rig cool without noise bleed
Putting a hot, high-powered rig in a sealed closet sounds ideal until it overheats. Proper ventilation is essential to keep temperatures safe and prevent fans from roaring.
Passive vents work, but active exhaust fans—quiet and ducted—are better. For instance, a streamer built a custom ducted vent with a silent fan, which kept the rig cool without adding noise to the room.
Why is this important? Because heat buildup can cause hardware to malfunction or degrade over time, and fans can introduce unwanted noise if not properly managed. Good ventilation ensures your equipment runs efficiently and quietly, maintaining your recording environment’s integrity. Check out [this guide](https://thorstenmeyerai.com/reduce-heat-noise-ai-workstation/) for detailed strategies that balance cooling needs with noise control, helping you avoid overheating without compromising sound quality.
The “rig in the closet”: a smart, scalable solution
Moving your entire workstation into a closet might seem extreme, but it’s one of the most effective ways to isolate noise. When the rig runs in a closet, it’s out of your immediate space, and you can focus on good placement and treatment without noise distractions.
Just remember: ventilation, sealing, and proper treatment are your best friends here. Many creators successfully use DIY blankets, foam, and fans to create a quiet, cool environment.
For detailed ideas, check out [this article](https://thorstenmeyerai.com/reduce-heat-noise-ai-workstation/) on how to make it work.
Frequently Asked Questions
What’s the difference between acoustic dampening, sound absorption, and soundproofing?
Acoustic dampening reduces echo and reflections within a space by absorbing sound waves. Sound absorption is a type of dampening, achieved with foam or panels. Soundproofing blocks sound from escaping or entering a space, usually with dense barriers or sealing leaks—it's a much tougher, more expensive goal.
Where should I place foam panels in a closet studio?
Start with reflection points—walls directly behind and beside your microphone, and the ceiling above the performer. Mark these spots with a mirror or flashlight, then add panels there first. Covering about 20-30% of your wall surface with absorption material usually strikes a good balance.
Do I need bass traps in a small closet?
Yes, bass traps are especially helpful in small, parallel-walled closets. They tame low-frequency buildup that causes boomy, muffled recordings. Even DIY bass traps can make a noticeable difference in clarity and warmth.
How do I stop my closet from sounding hollow or boxy?
Focus on treating the primary reflection points on walls and ceiling. Adding absorbent panels at these points reduces early echoes. Also, sealing gaps around doors and adding rugs or soft materials on the floor help soften reflections and prevent hollow-sounding recordings.
Is it better to use foam, blankets, or panels?
It depends. Foam panels are great for treating specific reflection points. Moving blankets and heavy curtains are cheap, flexible, and good for sealing or broad absorption. Combining both—foam for critical reflection points and blankets for leaks—gives the best results without overspending.
Conclusion
In tiny, noisy spaces, the real magic happens through smart placement and targeted treatment. Moving your rig into a closet can be a game-changer—if you give it proper ventilation and treat the right surfaces.
Think of your closet as a blank canvas. With a few strategic moves, you can turn it into a quiet, focused recording haven. The key is to treat the surfaces that matter most, seal leaks, and keep your gear cool. Happy recording!